DIY Car Window Tinting Fiasco
For a while now, I wanted to get the windows on my car tinted. The idea occurred to me when I was trying to find an alternative way to sun shades and I thought it would give me and my family more privacy as well. Other people may have different reasons but for me I wanted to block the sunrays when in the car and be able to travel comfortably without the uneasiness of people staring at you and that would give us the added benefit of being able to change our baby’s nappy in the vehicle anywhere we’re parked without anybody noticing (yep some places don’t have baby changing facilities!). Anyway, I decided to do it myself to save money but also because I didn’t think it was a difficult task. So I checked the prices for the tint film and I was able to get a 6m roll for £10 with free delivery on eBay. Perfect!
There are different shades for the tint film and I opted for a 15% Dark Smoke one which provides a good balance for visibility and privacy. It was anti-scratch, anti-crease and had a reflective coating to it. The kit consists of a 76cm x 6m tint roll, a yellow squeegee and a cutting knife. I watched a few videos on YouTube to get myself familiar with the procedures and then I was ready to give it a try.
Items needed
- 70% water, 30% alcohol solution for cleaning
- Spray bottle filled with solution made up of 5 drops Johnson’s Baby Shampoo or washing up liquid to 1 pint of water
- Paper towels / cloths
- Squeegee
- Cutting knife
How to tint your windows
- You will need to clean your windows properly first with the alcohol based solution, both inside and outside. This will ensure there’s no dirt trapped between the film and your window and there shouldn’t be any marks or grit too for the best results.
- Spray the shampoo or washing up liquid solution on the window you want to work on first.
- Place the tint on the window outside first (not inside) so that you can cut it to size. Remember to cut a little bit bigger than the actual size of the window.
- Using your solution of washing up liquid or shampoo, spray the inside of the window now.
- Peel off the film from the outside window to place on the inside. You want the adhesive side to stick onto the solution.
- Place tint 1/16 inch from the edge on the top of the glass. Your window must be a little open.
- Spray the solution on the film and squeegee water from tint starting from the top middle and working all the way to the edges. Use the cloths / paper towels to absorb water while trying to get the bubbles out.
- Roll your window up and continue the process.
- Repeat the steps for all other windows.
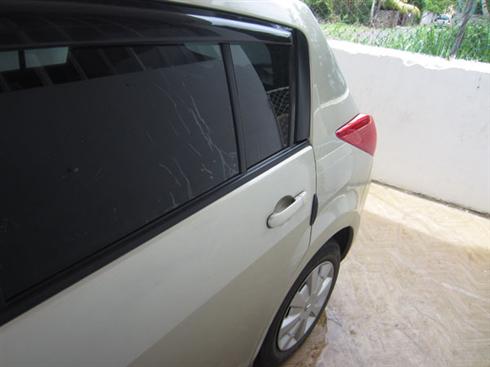
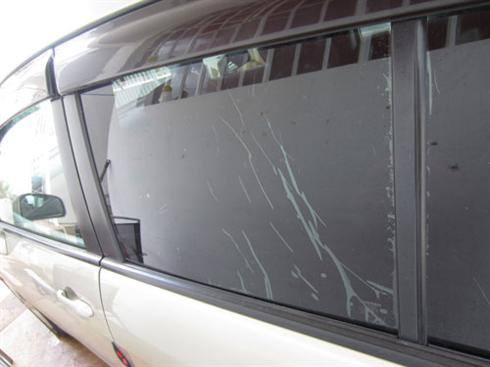
And that’s how car window look liked afterwards:
Problems I encountered
First the tint film is so thin that I couldn’t separate the liner from the adhesive. It was only after much time wasted that I ended up a piece of sellotape at each side of the corner and when pulled apart, separated the adhesive from the liner.
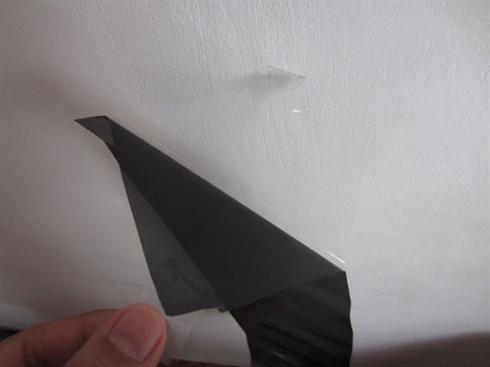
No matter how hard I tried, I just couldn’t get a clean cut of the film around the edge of the window. The cutting knife was very sharp but still you need a very steady hand and I don’t think I was meant for the job.
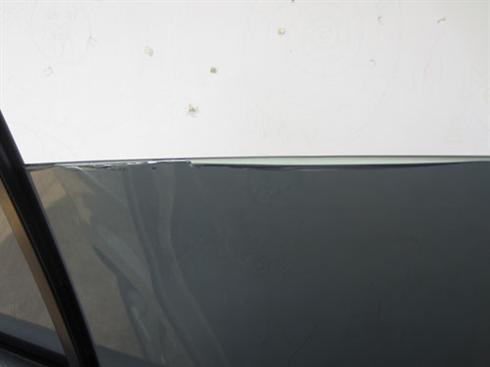
It is so difficult trying to get rid of all those air bubbles with the squeegee especially around the edges. If the tint film exceeds the window area, the bit which overlaps the edge will not stick to the glass and it ruins everything.
Conclusion
I spent a good couple of hours trying to install this but it was a complete disaster for me. Although I’ve had a lot of success with many DIY projects before, I was not up to the challenge for this one. This is a lesson which is only learned by experience and I’m happy I’ve tried it although I wished everything would work out in my favour.
Car window tinting does not come cheap though. Expect to pay in the range of £150-400 even for a small car if you go to a mechanic or garage. Therefore you should probably give it a try before spending so much money. You might have better luck than me anyway. Good luck!

1 Reply

It seems from the pictures that you did not squeege the water out starting from the middle, did not press the squeege hard enough or the glue on the film is no good. I would also suggest with this job to wait for hotter weather or use blow dryer to get rid of excess water from underneath the film. I did well for first time with all side windows but rear window is more curved and needed some heat shrinking of the film for which the blow dryer was not hot enough. Some heat gun used with caution should take care of this. It was not very easy but still better then paying £££s for professional as my car is 8 seater.
Similar topics for you


Driver SOS (UK)
Helping with car insurance, driving bans, learning to drive and other motoring issues